Skift Take
If you have the budget, 3D projection mapping can be an amazing and delightful vehicle for the ROI-justifying value the attendees came for. And the budget requirement might not be as big as you think.
As event professionals, we are under pressure to deliver on a number of fronts. Our events have to be productive and educational but also memorable and inspiring. Attendees justifying the cost of attendance seek transformative experiences and are more value-critical than ever.
Part of all of us responds to wonder, to beauty. We like to be amazed. Moments of fascination and entertainment are par for the course when you’re trying to pace your event and deliver all the educational goodies without overwhelming or draining your audience.
So, if you need a little inspiration for new and exciting ways to engage guests and create memorable event experiences, projection mapping could be the perfect solution.
What is Projection Mapping?
Imagine the sails of the Sydney Opera House coming to life before your eyes. Imagine walking through the doors of a business function only to suddenly find yourself in a life-like forest. Such experiences would no doubt turn any mundane function into a creative escape.
Of course, the sails didn’t come to life, and you didn’t walk through an inter-dimensional door. 3D projection mapping lets event planners bring ordinary objects in a range of shapes and sizes to life using engaging 3D displays.
Projection mapping (or ‘spatial augmented reality’) uses technology to project imagery onto 3D objects instead of traditional flat surfaces. Projections can be as basic as stage lighting or as complex as fully-mapped videos on industrial landscapes and buildings.
Think of it as painting with light – a way to evoke feelings within physical spaces and add colors, textures, and movement to otherwise mundane objects. In terms of what you can project, your options are limitless; you can project anything from 3D artwork to sponsor branding to complete lifelike environments.
And guess what?
You’ve probably come across this technology already in concerts, advertising, theatres, or even sporting events.
The Benefits of 3D Projection Mapping at Events
Why go for 3D projection mapping over traditional displays?
No Flat Surface Requirements
As an event planner, you don’t need to be confused anymore! With most display event-tech like LED screens requiring a flat surface, projection mapping lets you project onto any type of surface without distortion.
You can focus on the content of your projection instead of preoccupying yourself with incompatible surface types.
Everything from the sails of the Sydney Opera House to a wall column can be used as the object for a projection. With this flexibility, as an event planner, you can deliver a top-notch experience to attendees.
3D Imaging Without 3D Glasses
Projection mapping goes way beyond projecting images onto an object. The projectors can create 3D videos and images, and this allows you to turn any surface into a completely new one rather than simply distorting it.
This means attendees can step into a 3D world you create without having to put on 3D glasses.
You may have seen the amazing capabilities of this technology during an NBA halftime show. You can see the court ‘collapse,’ interact with people standing on it, transport the event center to another location, show videos, etc.
Such captivating experiences only happen because of 3D projection mapping.
Easy to Move Around
LED panels are large and uncomfortable to carry around. This can become especially burdensome if you need to put on an event in multiple locations in a short time frame.
That’s not even the half of it. If, for example, you discover that the traditional display system you just placed at the event facility would be better fixed at another location in the same room, you’d have to call the contractors back to uninstall it and fix it on the other wall or area. That’s an additional cost!
With projection mapping, all you have to do is map out the various objects you want to project onto in advance using the projection mapping software. When you’re ready to move to the next location, just pick up the projector(s) and go.
Repeated Use
If you’ve been to a one-off event that required a lot of printed props, displays or advertisements, everyone’s left wondering what to do after the event is over. What happens to the materials used?
The event planners or hosts could store all the props in the hope of selling them someday for a fraction of their original cost. They could also just throw them away.
But with projection mapping, you can program new content over and over again, and apply it to a range of surfaces in any venue. There’d be no need to purchase a new projector after each event, and your costs would be limited to the expense of the programmer.
The WOW Effect
This is certainly the major benefit of introducing 3D projection mapping at your events. As an event planner, you’ll always be faced with attendees who’ve seen it all when it comes to traditional displays, so how do you blow those people away?
Projection mapping! They need that wow effect. Who wouldn’t be gobsmacked walking into a conference center to find themselves surrounded by 3D depictions of the theme all over the walls of the building.
Here’s a great example of a theme projection at the light institute:
Projection mapping delivers an awestruck effect and will leave people gushing about the event months after it’s done.
Projection Mapping on a Budget
Many perceive projection mapping to be prohibitively expensive, but with the right help, it can be done affordably. To put yourself on the right track for getting your 3D projection mapping under budget, you’ll need a clearer understanding of your options and how to execute them. Start by asking yourself some key questions:
What options are within your budget?
If you’re working with a limited budget, reach out to an AV specialist or company before you set your heart on a specific projection idea. They should be able to give concrete advice on the possibility of bringing your ideas to life based on the type and scale of projection you want to include. This will ensure you get the best results for cash invested.
Before you meet with your AV company, check out our blog post on how to save money on your AV quotes. It’ll help you understand the technicalities of the process.
How big is the event venue?
If you’re working with a large space, you need more projectors, and projection mapping costs will be proportionately higher. Keep in mind that, if you have a tight budget, you don’t have to create a whole new 3D projected world for event visitors to enjoy the experience.
Concentrate on the focal areas of the venue – locations that catch the eye. You can also focus projections on areas that you expect guests to visit most, like the entrance, speaker podiums, bathrooms, and buffet tables.
Here’s a perfect example:
What do you want to project?
Cost will also largely depend on the size and complexity of the image/video you intend to project, as well as the size and number of surfaces on the object you want to project it onto. Topnotch 3D projection mapping, especially if it includes videos, will be on the higher end of the cost spectrum – particularly if you intend to incorporate live feeds.
If budget is a limiting factor, keep it simple. Project a brand logo on a 3D surface or create a textured presentation.
Focus on smaller, more meaningful activations. For instance, attendees may be just as enchanted by thoughtful, smaller video projections at their tables as with massive wall visuals and 3D environments.
Disney did this fantastically by projecting their characters onto white wedding cakes. As you can see below, this is a small-sized projection but its effect on the audience is massive.
What stage are you in the event planning process?
Even if you’ve already begun the planning process of your event, you can still introduce projection mapping. However, to maximize your budget, collaborations and creativity, try to include projection mapping as early as possible in the planning process.
If your creative steps lead you to simple or small projection designs, it’s recommended that you begin planning for a minimum of 6 weeks before the event. But if you’re going for more elaborate and complex visuals, you’d want to consult with your AV support as early as possible.
Having a longer lead-time will assist you in getting an affordable price and provide enough time for the finished creation to go through reviews and testing if necessary.
What’s the Best 3D Projection Mapping Option?
Depending on the size and scale of your ideas, you may need to call in a little back-up to assist with executing them. That said, if you have a tech-savvy creative on your team and you see projection mapping as a regular part of your repeated events, it might be well worth your while to invest in your own team and building out your projection mapping capabilities.
IN-HOUSE FACTORS
Does anyone on your team have the knowhow to create 3D projections? If yes, then it may be more budget-sensitive to buy the latest projection mapping software and make it in-house.
However, keep in mind that if you’re going this route, you may have to also rent pieces of equipment not currently in your possession. For instance, a hard drive, a server and projectors.
Here are some benefits of going in-house:
- Long-term benefits
- Maximum personalization
- A clearer understanding of the project
With that said, many event planners will not have a team with the skill and availability to handle projection mapping in-house. In that case, it will likely be more costly to train your team than to simply outsource.
OUTSOURCING FACTORS
Many projection-mapping companies can design and implement what you need, especially if you’re going for something particular like projection mapping onto buildings or vehicles. They will have more experience with typical projections and are in a better position to handle unique requests more expertly.
You also have the option of going with AV companies that offer 3D projection mapping, with the added benefit of ensuring that your 3D projection requirements and AV setup synchronize properly.
If you choose to outsource, it’s best practice to consult with your AV company first and ensure your expectations are realistic. Work closely with your AV team to vet and home in on the most practicable ideas, implement their advice, and come up with something amazing as a team.
Here are a few benefits of outsourcing:
- Professional input from industry leaders
- Access to the latest resources, software and devices
- Top-notch expertise to inform execution at the event
Projection Mapping Tutorial
Having an overview of the costs and options for 3D projection mapping, let’s proceed to look at how you can achieve it.
Below is a systematic tutorial that will guide you to achieving excellent projection mapping effects, just like expert projection mapping companies would deliver.
1. Select a Suitable Environment
To achieve a good projection mapping, you need to ensure that the environment is suitable.
Whether you’re creating a new surface or using things available in the existing environment, the first thing you should consider is the size of the surface you are using, as it will be a major determinant of the cost of projection mapping.
Next, you need to identify the objects you will be projecting onto because certain textures are not suitable for projection mapping – especially those with reflective surfaces. Choose the mapping object wisely. Translucent surfaces are great for projection mapping because light from the projector glows through them, creating an ethereal feel, but opaque surfaces may be better for crisper images.
2. Measure the Environment
You will need to measure the size of the object that you will be projecting on, as well as the distance between the projector and the object you will project on. This will come into play when you’re using the projection mapping software, and it will determine the type of lens you will need as well as the level of brightness of the projection.
At this point, you will need to decide where to place the projector. It needs to be placed in a location where people won’t trip over it or obstruct the projection. As such, placing a projector on the floor is not advisable.
When choosing where to place the canvas or mapping object, focus on the areas that are eye-catching (focal points). Strategically position the objects in the areas where you expect guests to visit most.
Another important factor that you need to pay attention to in this first stage is the lighting of the room or space you are using. If the space is too bright, it won’t be good for the projection because it will make it look faded or invisible. To solve this problem you can get a brighter projector or reduce the brightness in the environment using curtains or tinted windows.
When all is set, you can proceed to take a perspective photo. The perspective photo will be used to mock up the content in the next stage and also prepare a 3D rendering. The perspective photo should be taken close to the angle of the projector.
3. Choose the Right Content
From the beginning of the project, what you want to achieve should already be clear to you. You should already know if it’s motion graphics, video, live stream 3D or image content you want to project.
Whatever content you choose, you need to pay attention to the resolution and image size as they may vary based on the hardware you are using.
There are a lot of questions you need to answer at this stage:
- What visual will best convey your message through the object?
- What format (videos, images, etc.) is the most suitable?
- Will you pair the projection with audio?
- Will the content spread across the entire object
- Will the different areas of the object receive different content?
It is at this point that you will also decide whether the projection will remain static, continually loop or cycle through multiple versions.
4. Get the Right Hardware
The success of your projection mapping depends on the hardware. The environment and size of the target object will determine what kind of equipment you will use; the gear needed to project onto a small object is different from that needed to project onto a big object like a building.
The larger the space and object, the larger and brighter the projectors that you will need. If the object is very big, you may need multiple projectors.
You will also need to consider the bulbs, lenses and mounts for the projectors. If you pair the projection with audio, you need to have audio systems that are suitable for the environment or space you will be using.
5. Projection Mapping your Object
This is the stage where you put content on the object.
The first thing is to recreate the object you will project on with projection mapping software. It is critical to get the correct size and shape of the object precisely, otherwise the projection will look sloppy and you’ll ruin the effect.
If you are using more than one projector, you must blend and mask the content together to make it look like the projection came from one source.
Objects that have depth or curve are a little trickier to map than those with straight edges, but you should be able to wrap the content with your mapping software.
If the projection mapping doesn’t line up with the object and spills over to the environment around it, you can mask out the overlap, as a mask projects black where you don’t want visuals. This makes your image fit perfectly to the object from the viewer’s perspective.
Here’s an example of a mask-blocked image:
After masking, you may need to do a little tweaking for the alignment to be perfect.
When you are done with this step, all that’s left is to ensure that everything is in its right place and functioning well. When everything is set, your mapping projection is set.
Projection Mapping Ideas to Deliver Amazing Event Experiences
There are many innovative and exhilarating projection mapping ideas you can use to make your event outstanding. From interactive projection mapping to panoramic backdrops, the opportunities are limitless.
In this section, you’ll find different projection mapping ideas and examples that you can use for your next event.
1. Play a Welcome Video on the Exterior Walls
You can use projection mapping to create a good first impression by playing a video on the exterior wall at the entrance of the building to welcome guests to your event.
The video can be an introduction of the event, a message to the guest or an animated logo. If the venue has a unique architectural feature, use it as the target object to capture the attention of the guests.
2. Create Panoramic Backdrops
You can create striking panoramic backdrops for your event using projection mapping.
This is particularly effective for events at which the guests will be expecting to see a plain and sterile venue. Transform the boring venue into a colorful and dreamlike beauty to set the tone of engagement for the event.
The backdrop can be an aquarium with colorful fish swimming by, a fireworks-lit sky or a serene autumn forest like the one below. Whatever you choose to use, let it align with the meeting theme and be sure to add to the meeting content, rather than distract from it.
3. Display Your Products
If you have a corporate event, like a corporate anniversary or a product launch, you do not need to transport the samples of your product to the event venue. You can display your products using projection mapping.
For instance, if it’s an auto show, you can create and project a realistic 3D image of the cars to the audience. This will make it easier for you to change the model and color of the car during display, or if you want to showcase a car design that’s in development.
You can even use it to create an interactive activation. Put a product in the room, and allow people to embellish it or add design elements, just like this:
3D projection mapping can also be an alternative to virtual reality activations designed to engage your attendees. In keeping with the car show example, imagine a car that people can get into with a 3D video of the car moving in a real-life environment, like an empty highway at dusk or a muddy road through an African savanna.
This will give the guests an immersive and unforgettable experience.
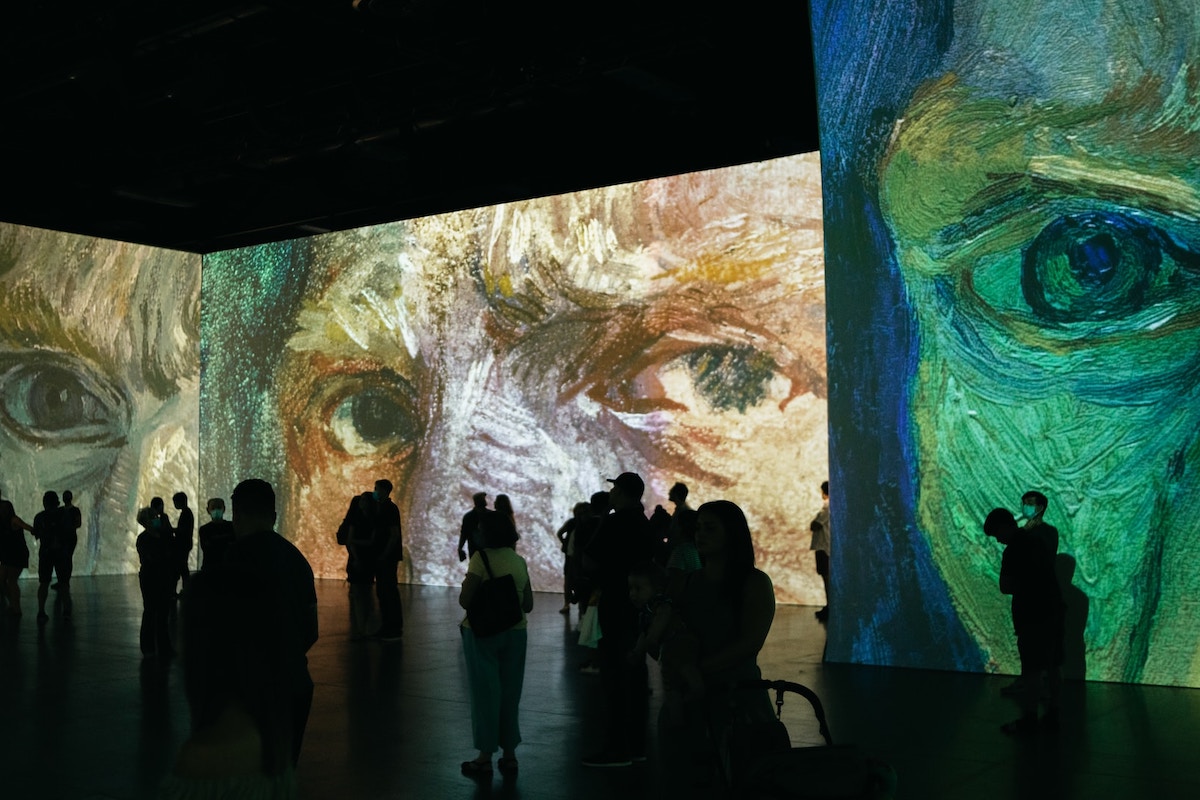
4. Create Art Projections to Capture Attention
Artistic designs and creations can be 3D projected to create awesome visual effects in your event.
This can take the form of interactive activations like the one above or simply be used to create stunning effects on stages and other focal points. If you do use it to embellish a stage performance, be conscientious of the performer’s position vis-a-vis the projection.
Everyone on stage must be aware in advance of where the projection is coming from to avoid obstructing the projected image if you’re using the projection within the background. If the performer or presenter is the target object, they must remember not to move and to wear the clothes that were used when the projection mapping was designed.
For example, during the 2013 Grammy awards, Carrie Underwood’s dress was transformed into an animated light show. Animations transformed her dress into a galaxy of stars, a cascade of petals and a swarm of butterflies that coordinated with the music and the screen behind her with an incredible impact.
But if you watch until the end of this ABC coverage, you can compare the glamorous effect of Underwood’s light-show gown with what can happen if you don’t correctly define the shape and size of the object you’re projecting onto. At the end of the video, the model’s chest and arms are receiving the same treatment as the dress, which diminishes the effect.
5. Create Engaging Presentations
Speaking of presentations, you can use projection mapping instead of traditional displays or PowerPoint slides, which can be tiresome and make guests disposed to distraction after a short while.
Create a beautiful visual display to accompany the speaker. If the keynote speaker is talking about global warming, for example, you can blend in elements of audio, video and photographs showing the effects of global warming on the environment.
This way, the audience will easily understand and feel engaged with what is being said.
6. Create Beautiful Architectural Designs and Sculptures
If the venue for the event does not have enough decorations to suit the event, rather than paying for physical artwork or decorations, you can use projection mapping to highlight or create interesting architectural features in the building.
Add a colorful flair to these unique features to beautify them, like this:
7. Project on the Ceiling
The ceiling is an often neglected feature when decorating a venue for an event.
With projection mapping, you can turn the boring ceiling into a beauty to behold. If the event relates to astronomy, you can project a beautiful picture or video of the solar system on the ceiling.
In keeping with that theme, a starry sky on the ceiling is a great way to add ambiance to any evening networking events without having to contend with the unpredictability of the actual night sky.
8. Create Beautiful Tabletop Centerpieces
This will create more space on the tables for the guest. You can also create tabletop centerpieces for dining tables and buffet stands if it’s a dinner party.
9. Project Lights
Instead of hanging lights or making use of bulbs in the venue, you can project lights to the ceiling or any other part of the venue where illumination is needed.
Before you do this, however, be sure to evaluate the relative energy costs and determine the impact on your event’s carbon footprint. For large venues, having a beautiful lighting effect but a generally darker space might be preferable to high powered lights, but this might not be the case in smaller spaces that take less energy to keep well-lit.
10. Use Projection Mapping to Switch Activities on a Dime
If you are having two different functions in one space one right after the other – say a keynote session and cocktail networking event, you can use pictures or video mapping to wrap up one event and switch to the other in a split second.
The transformation of the appearance can also be used to highlight a particular section of the venue where something important is going on, for example, the dance floor.
11. Create Custom Projections that Incorporate Event Storytelling
Speakers and other event professionals are now adopting storytelling as both an educational and a sales tool, and using projection mapping to either create an ambiance that helps the story sink in or to actually depict points within the story can be a powerful way to make sure both personal and brand stories resonate with the audience.
If you’re speaking or presenting at an event, projection mapping can create an immersive experience for guests that resonates with the message you’re trying to deliver.
For example, at a United Nations climate summit in Paris, monuments in the city were to be mapped with generated 3D trees, giving guests a feel of what the summit was all about.
Here’s how it looked:
12. Truly Interactive Projections
These aren’t strictly mapped projections as we’ve described them above, but they’re too cool not to mention!
While the tech may be a little too cutting-edge for an event activation at the moment, advances in interactive projections have a lot of promising applications as well.
Check out this video to get a glimpse of the possibilities.
Imagine wowing your audience with a projected guest book or interactive seating chart at the entrance of the venue. Touching their names on the projection, they could be shown where the seat reserved for them is located.
Projection mapping offers boundless opportunities for event planners and professionals. From turning a United Nations conference into a journey through the amazon forest to showcasing insane artwork on the exterior of museums, you can literally let the sky be the limit.
Simply follow the steps we listed above, take your pick from the ideas and create that magic.
Photo credit: Redd F / Unsplash